|
A user's review of the MikroElektronika VR Stamp development system
For those who dream about embedding speech, music & voice recognition in their systems, Sensory Inc. has built a powerful RSC-4128 based stamp.
MikroElektronika released in March 2006 a complete development kit system for this stamp, with a board named Easy-VR Stamp, and a C compiler named RSC-4x mikroC compiler.
As a user of this tools, here is a little review of what you have to know about it.
Later, I will add some VR Stamp C source code examples, just like I do for PICs.
Also, I added a new forum for VR Stamp discussion, then a project example : a Voice Controlled LED Light Show
1/ What comes with the MikroElektronika Easy VR-Stamp development system
Unpacking the box, here is what I found :
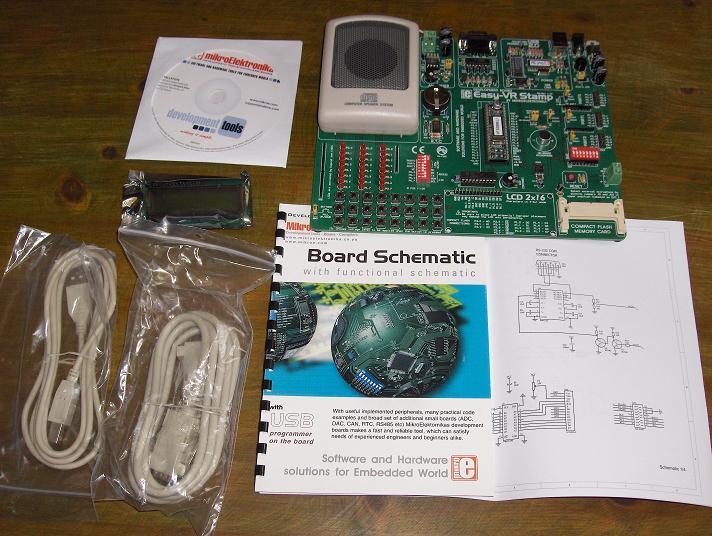
From top to bottom, and from left to right :
- the CD with software. I did not use it, I explain why below
- the most important : the board, with a VR Stamp plugged into its socket
- a 2 lines x 16 characters LCD display (not included in the base package, sold separately)
- the USB cable to connect the on-board programmer to the host computer
- a serial cable to connect the VR Stamp to a host computer (RS232 level adapter is on the board)
- the board manual with schematic.
As usual with MikroElektronika, the board looks great ! Let's have a closer look.
2/ The Easy-VR Stamp board
Here is a view of the board :
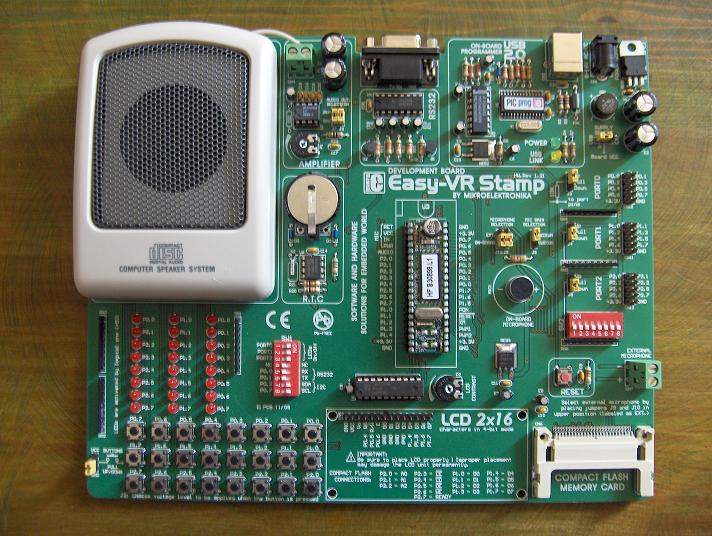
As you can see, it looks funny : it is not usual to have a speaker system on development board, but MikroElektronika dared to include a speaker and a microphone on its board.
You understand immediately that you have nothing to add to start working !
From top to bottom, and from left to right, you can see on the board :
- the speaker system : thanks to its big case, the speaker sounds good. An audio out connector is also available if you want to connect your own speaker
- the audio amplifier, with a little pot to adjust the volume level. Some jumpers select either DAC or PWM coming from the VR Stamp
- the RS232 socket and level adapter (MAX232)
- the USB programmer : binary files for VR Stamp are big, and a high-speed programmer is needed, for tests & firmware updates as quick as possible
- the power supply : the board may be powered either by USB connection, or by external low voltage AD or DC supply, depending on a jumper state
- the real time clock and its battery cell : it is based on the popular PCF8583 I²C chip
- the VR Stamp socket, with all pins clearly identified
- the microphone, with its associated jumpers to select gain or external microphone
- three sets of 2x5 ICD connectors, with all pins marked. They give access to the MCU I/O pins, and to the 3.3V power supply. I/O may either be pull-up or pulled-down (resistor arrays are on board) with jumpers, PORT2 has its own DIP switch
- 24 leds, to display the MCU I/O pins state
- a DIP switch to configure some I/O pins
- a 5V <=> 3.3V level adapter for the LCD display, with a contrast pot
- the 3.3V regulator
- the reset switch
- the external microphone connector
- 24 buttons are connected to the MCU I/O pins, buttons are globally set for pull-up or pull-down with a jumper
- the 2x16 LCD area, with plugs
- a Compact Flash Memory Card slot : some applications may require external data storage for voice, music, logs...
The board reflects the quality we can expect from MikroElektronika, and users of others of their boards will immediately feel familiar with it.
3/ Pluging the board
The board comes with a ready-programmed VR Stamp. So when you power the board for the first time, the board starts immediately to run a program example. I don't remember which one ! But you immediately hear something from the board. The jumpers are also accorded to this first example.
4/ Installing USB Drivers & Flash software
I usually download software from web sites, instead of using the CDs that come with the packages, just to be sure to have the latest releases.
First, I downloaded the USB Drivers and the VRStamp Flash Software from this page :
http://www.mikroe.com/en/tools/easyvrstamp/
After installing these softwares, the Easy VR Stamp USB programmer was correctly detected, and the VRStamp Flash programmer software was able to communicate with the board.
5/ Installing RSC-4x mikroC compiler
This step is not difficult but you will have to pay attention to the mikroC manual to do it right.
I did it for you !
The RSC-4x mikroC compiler is based on a third-party assembler and linker : you have to install them properly. Just follow these steps :
First, download the RSC-4x mikroC compiler from this web page :
http://www.mikroe.com/en/compilers/mikroc/rsc4x/
It comes with the complete IDE, a built-in manual, libraries : just follow the instructions and install it on your computer.
The download is free, without registration form.
Without a licence key, the .HEX ouptput is limited to 64K of program words (RSC-4128 small memory model), that is enough to do the first tests.
If you launch the compiler and try to build the example, you will get an error message : of course, there is no assembler nor linker !
Second, you will have to install the development package for Sensory RSC MCU (MCA-SE assembler & MCLINK linker) :
Just follow the instructions given by the built-in help of the RSC4x mikroC compiler when you try to build the example, here is the package to download :
http://www.phyton.com/downloads/project-se.zip.
The package is free, without registration form.
Close the compiler and install the package on your computer.
Then, launch the compiler and don't forget to give the path of the package to the compiler :
Tools-> Options -> Preferences -> Corss Tools -> External assembler & linker path
This done, you will be able to build the mikroC examples : press the build button, it works ! The .HEX output file is generated.
Load it into the VRStamp Flash Software and press the "Write" button : the program will be flashed into the VR Stamp, and then it starts to run.
That's a good step !
Third, The FluentChip library :
Now, open a project in the __Senory_Examples directory and try to build it : you will have a lot of errors, there is still something wrong !
The Sensory's FluentChip library is the missing part, you will need it to use the advanced speech, music & voice recognition features of the chip.
Go to this web page :
http://www.sensoryinc.com/html/products/rsc4xtools.html#form
You will need to register to download the library package, but it is also free, so fill the form, and download the FluentChip & QuickSynthesis 4 package (25MB), then install it.
Then, don't forget to give the path to the FluentChip includes & libs to the compiler, you will have to do this for each project :
Tools -> Options -> Search Path, then both lib & include
The default paths that come with the compiler are wrong, because a new version of the FluentChip library has been released since the packaging of the mE compiler.
This done, you are ready to work, and you will be able to compile some short Sensory examples, the biggest ones will need a RSC-4x mC licence key.
Anyway, if you don't have a MikroC licence key, all the Sensory examples are ready to be flashed : just select the .HEX file with the programmer, and you will hear the smooth voice of your favorite board !
6/ My opinion
I have been very impressed by the speaker independent speech recognition example (simple math quizz t2simath example in the __Sensory_Examples directory), which works fine in a noisy room.
Exploring all the possibilities of the board (including sound effects, Karaoke, MIDI & DTMF features...) will need a little bit more time, but it is worth the time.
The MikroC for RSC-4x shares the same IDE than the MikroC for PIC, with some interesting extra features.
For example, you can reduce & expand a C block in the editor :
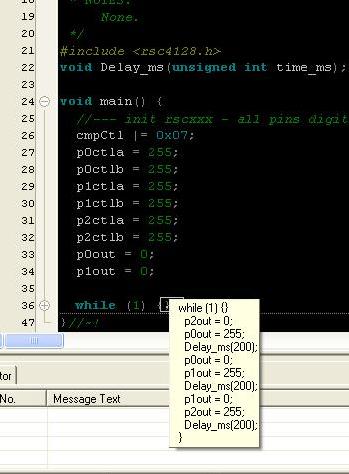
As you can see, the while(1) {} block is reduced and its content is displayed in a pop-up frame when the cursor enters the block.
Just click on the + or - symbols in front of the line to expand or reduce the blocks.
With a few words, I liked very much :
- the on-board speaker & microphone : as far as I know, this is a unique feature for a VR Stamp development system
- the quality & finition of the board
- the fast USB programmer
- the comfortable IDE of the compiler
I found no real weakness in this development system, but a little bit more care in the manual to explain the rules and installation of external assembler, linker and libraries would have been helpful.
7/ Useful links & datasheets
Before posting in the forum to ask for assistance, I suggest you to follow these links :
And now, happy coding !
|