Did you find this site useful ? Please
to help www.micro-examples.com

If you need a coder or a freelance programmer, submit your project to me


PIC16F877A Thermometer with MCP9700A sensor

Printer-friendly version | Forums | FAQs |

 MCP9700A temperature sensor with LCD and PIC16F877A on EasyPIC4 board


You already know my silicon diode thermometer,
this time I'm using a Microchip MCP9700A analog temperature sensor :
cheap and easy to use, factory calibrated, it is plug and play.

Let's plug it to an EasyPIC4 to see how we can play with it !


the sensor : Microchip MCP9700A Thermistor

The MCP9700A is a low power linear active thermistor from Microchip, it features :

  • a tiny package, only 3 pins : Ground, power supply and output 
  • a temperature measurement range from -40°C to +125°C with +/- 2°C accuracy
  • a power supply range from 2.3V to 5.5V with a very low operating current : 6µA !
  • a +10mV/°C temperature coefficient

It is designed to be directly connected to a PIC analog input :

MCP9700A circuit schematic
MCP9700A circuit example (from Microchip datasheet)

Its linear output simplifies software : 500mV ouput is 0°C, and 10mV is 1°C :

MCP9700A output curve
MCP9700A output voltage curve (from Microchip datasheet)

Other similar sensors of the same family are MCP9700, MCP9701, MCP9701A.

To learn more about these sensors, please read the datasheet :
http://ww1.microchip.com/downloads/en/DeviceDoc/21942c.pdf

Plug and play

If you have an EasyPIC board, just put the MCP9700A sensor in place of the DS1820 sensor this way :

MCP9700A Temperature sensor on EasyPIC4 development board

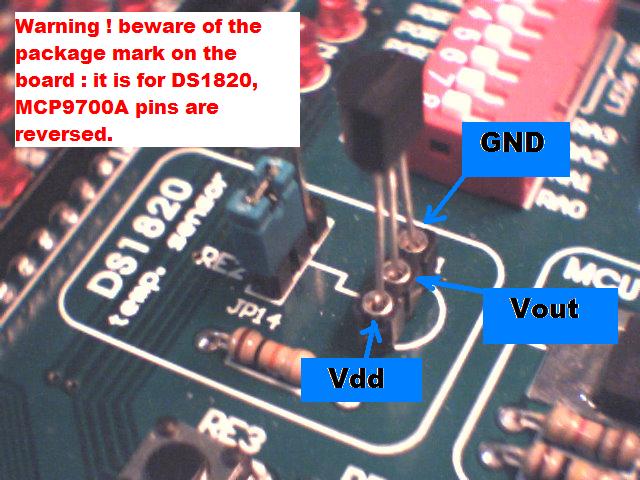
Take care to plug the MCP9700A correctly : the flat side of the package must be on the D1820 curved side !

Then connect JP14 to RE2. That's all !

C source code example

Here is a mikroC source code example to display temperature in Celcius and Fahrenheit degrees on a LCD, using a MCP9700A temperature sensor.
If you don't have mikroC compiler you can download it from : http://www.mikroe.com/en/compilers/mikroc/pic/

As you can see, I took advantages of the new mikroC LCD custom character generator to build symbols for °C and °F, as well as new "export code to HTML" feature of mikroC V7.0.0.3 to add color to the source code for better clarity :

/*
 *******************************************************************************
 * PIC DIGITAL THERMOMETER USING A MICROCHIP MCP9700A ANALOG SENSOR
 *******************************************************************************
 *
 * source code example for mikroC users
 * feel free to use this code at your own risks
 *
 * target : PIC16F877A, 8 Mhz crystal
 * HS clock, no watchdog.
 *
 * easyPIC4 settings :
 *      MCP9700A on DS1820 socket, see web page for more details.
 *
 * Author : Bruno Gavand, September 2007
 * see more details on http://www.micro-examples.com/
 *
 *******************************************************************************
 */

/*
 * LCD_printfix constants
 */
#define	INT_RANGE	1000	// integer part : 3 digits
#define	DEC_RANGE	10	// decimal part : 1 digit

/*
 * this counter is incremented on each TIMER0 overflow
 */
unsigned int cntr ;

long    temp ;          // Temperature in Celcius * 10
int     fahr ;          // Temperature in Fahrenheit * 10

/*
 * offset reference of the sensor : 0°C is 500 mV => 102.4
 * since the sensor is factory calibrated, there is no need for adjustment
 */
int     ref = 1024 ;            // offset is multiplied by 10 to get tenth of degrees

/*
 * LCD character definitions, generated by mikroC LCD Custom Character tool :
 */
const char characterC[] = {8,20,8,0,3,4,4,3};   // °C
const char characterF[] = {8,20,8,0,7,4,6,4};   // °F

/*
 * print character pointed to by def at line pos_row column pos_char on LCD
 */
void CustomChar(const char *def, unsigned char n, char pos_row, char pos_char)
        {
        char    i ;
        
        LCD_Cmd(64 + n * 8) ;
        for(i = 0 ; i<=7 ; i++)
                {
                LCD_Chr_Cp(def[i]) ;
                }
        LCD_Cmd(LCD_RETURN_HOME) ;
        LCD_Chr(pos_row, pos_char, n) ;
        }

/*
 * print v with fixed-size integer and decimal parts
 */
void	LCD_printFix(unsigned int v)
	{
	unsigned int w ;
	unsigned int d ;
	unsigned char n ;
	unsigned char  blk = 1 ;           // zero blanking

        	if(v >= 0)
                	{
		LCD_Chr_Cp('+') ;
                	}
        	else
                	{
		LCD_Chr_Cp('-') ;
                	}

        	v = abs(v) ;
	w = v / DEC_RANGE ;
	for(d = INT_RANGE / 10 ; d > 0 ; d /= 10)
		{
		n = (w / d) % 10 ;
		if(n)
                        	{
        			blk = 0 ;
        			}
		if(blk)
                        	{
        			LCD_Chr_Cp(' ') ;
        			}
                	else
                        	{
        			LCD_Chr_Cp('0' + n) ;
                        	}
		}
	LCD_Chr_Cp('.') ;
	w = v % DEC_RANGE ;
	for(d = DEC_RANGE / 10 ; d > 0 ; d /= 10)
		{
		LCD_Chr_Cp('0' + (w / d) % 10) ;
		}
	}

/*
 * interrupt routine, called on each timer0 overflow
 */
void    interrupt(void)
        {
        if(INTCON.T0IF)                         // timer 0 overflow ?
                {
                cntr++ ;                        // increment counter
                INTCON.T0IF = 0 ;               // done
                }
        }

/*
 * program entry
 */
void    main()
        {
        ADCON1 = 0x00 ;                         // set PORTA as analog input
        TRISA = 0xff ;                          // set PORTA as inputs
        TRISD = 0 ;                             // PORTD is output
        LCD_Init(&PORTD) ;                      // Initialize LCD connected to PORTD
        LCD_Cmd(Lcd_CLEAR) ;                    // Clear display
        LCD_Cmd(Lcd_CURSOR_OFF) ;               // Turn cursor off
        LCD_Out(1, 1, "MCP9700A EXAMPLE");      // Print welcome message

        OPTION_REG = 0x80 ;                     // start timer 0, no prescaler
        INTCON = 0xA0 ;                         // allow timer 0 overflow interrupt

        for(;;)                                 // forever
                {
                if(cntr >= 4000)                // if enough time since last sample
                        {
                        /*
                         * read the sensor
                         */
                        temp = Adc_Read(7) * 10 - ref ;      // read RE2 ADC, adjust to 0°C

                        /*
                         * get the result in celcius * 10
                         * sensor temperature coefficient is +10mV/°C
                         * ADC resolution is 5000/1024 = 4.88 mV so one ADC point is 0.488°C
                         */
                        temp *= 488 ;
                        temp /= 1000 ;

                        fahr = ((9 * temp) / 5 ) + 320 ;       //  convert C degrees to F * 10

                        /*
                         * print temperature in °C on LCD
                         */
                        LCD_Out(2, 1, "") ;
		      LCD_printFix(temp) ;
                  	      CustomChar(characterC, 0, 2, 7) ;

                        /*
                         * print temperature in °F on LCD
                         */
                        LCD_Out(2, 10, "") ;
                  	      LCD_printFix(fahr) ;
                  	      CustomChar(characterF, 1, 2, 16) ;

                        cntr = 0 ;              // clear counter
                        }
                }
        }

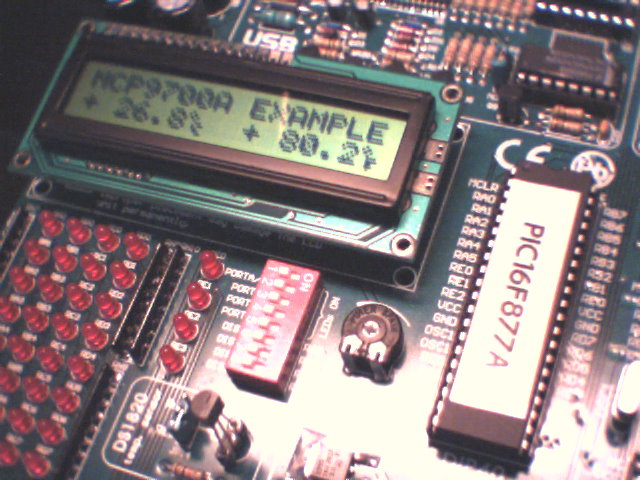
Is it plugged ? Then play !

It should work at first try, this is what you should get on your LCD screen :

MCP9700A LCD thermometer

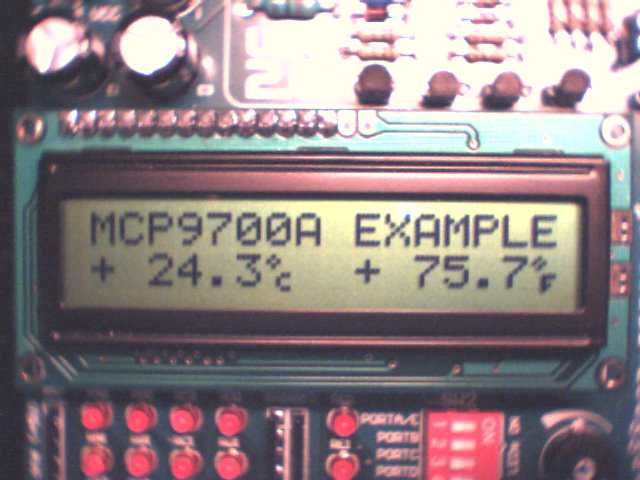
Plug and play, as I said Cool !

This sensor can take place in applications where relative temperature changes are monitored, rather than absolute temperature : computer fan control, home appliance, motors and batteries temperature control for robotics...

Please report bugs, comments or suggestions in my forum.


All trademarks and registered trademarks are the property of their respective owners